 techandtab
We may receive a commission on purchases made from links. While laptops from reliable brands like Dell and...
How To Resize An Image On A Mac Or PC
When working with photos, resizing them is something you might need to do from time to time. This involves adjusting an image’s dimensions — its width and height — to meet specific requirements. There are several reasons you may need to resize an image. For example, if you’re uploading a photo to social media or a website and it exceeds the file size limit, resizing can help you meet those restrictions. Similarly, reducing the file size of large images can free up valuable storage space on your computer.
Whatever your reason may be, the good news is that you don’t need to use any third-party photo editing software or web tools for this. Both Mac and Windows computers come equipped with built-in tools that make resizing images quick and easy. Whether you’re working with a single image or need to resize multiple photos at once, these built-in tools can help you get the job done. In this guide, we’ll walk you through the steps to resize images on both Mac and PC.
How to resize an image on a Mac
Resizing an image on a Mac is fairly straightforward, thanks to the built-in Preview app. Here are the steps to follow:
- Locate the image you want to resize in Finder and double-click the file to open it in the Preview app.
- Click the Tools menu at the top, then select “Adjust Size” from the resulting menu.
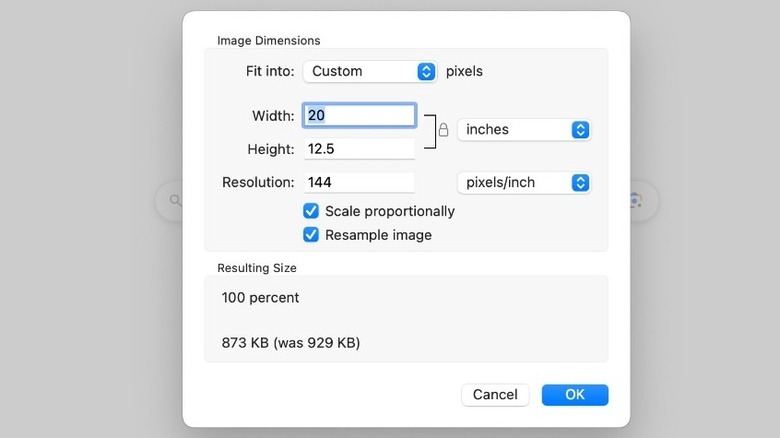
- In the Image Dimensions box, click the “Fit into” drop-down menu to select one of the predefined sizes. Alternatively, select the Custom option to enter your preferred width and height manually.
- Tick the “Scale proportionally” checkbox to maintain the image’s proportions (aspect ratio).
- Click OK to view the resized image. If you’re not satisfied with the results, press Command + Z to undo the changes and try again. If the resized image looks good, press Command + S to save the file or choose File > Save As to create a new version.
And that’s it! Your resized image is ready. If you need to resize multiple images to the same dimensions, the process is just as simple. Start by opening all the images you want to resize in Preview, then go to Edit > Select All. Next, click Tools > Adjust Size and then follow the steps mentioned above to resize all the images at once. This functionality is especially useful when working with a batch of photos that need to be resized for a project or upload.
How to resize an image on Windows using the Photos or Paint app
If you’re using a Windows 10 or 11 PC, you can use the Microsoft Photos app to resize an image. Here’s how:
- Find the image you want to resize, right-click on it, and select Open with > Photos.
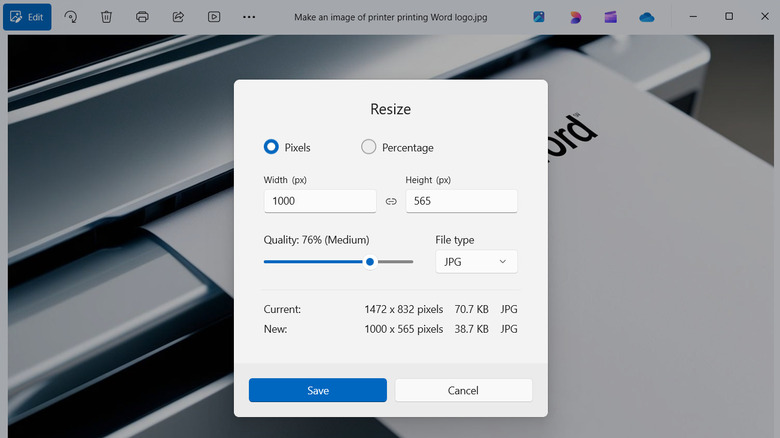
- Click the three-dot menu icon at the top and select “Resize image.”
- In the Resize dialog, enter your preferred width and height to set custom dimensions. Alternatively, choose the Percentage option to scale the image proportionally.
- Use the Quality slider to adjust the image resolution and use the “File type” drop-down menu to change the file format, like JPEG or PNG.
- Click Save. In the Save As dialog box, enter a name for the file, choose a location, and click Save again.
Similar to Microsoft Photos, the built-in Paint app also allows you to resize images on your Windows PC with ease. Here’s how:
- Locate the image you want to resize. Right-click on it, and select Open with > Microsoft Paint.
- Press Ctrl + W to open the “Resize and Skew” dialog box.
- Select your preferred option for resizing — Percentage or Pixels — and enter the values in the Horizontal and Vertical fields.
- Make sure the “Maintain aspect ratio” box is checked to keep the proportions consistent.
- Finally, press Ctrl + S to save the changes to the original image, or press F12 to open the “Save As” dialog box and save the resized image as a new file.
How to resize multiple images in bulk on Windows using PowerToys
While the Photos and Paint apps are useful for resizing individual images, they don’t offer an option for bulk resizing like Mac’s Preview app. To resize multiple images at once on Windows, you’ll need to use Microsoft PowerToys. This free utility includes an Image Resizer feature that makes batch resizing quick and hassle-free. Here’s how to use it:
- Download and install the PowerToys app from the Microsoft Store.
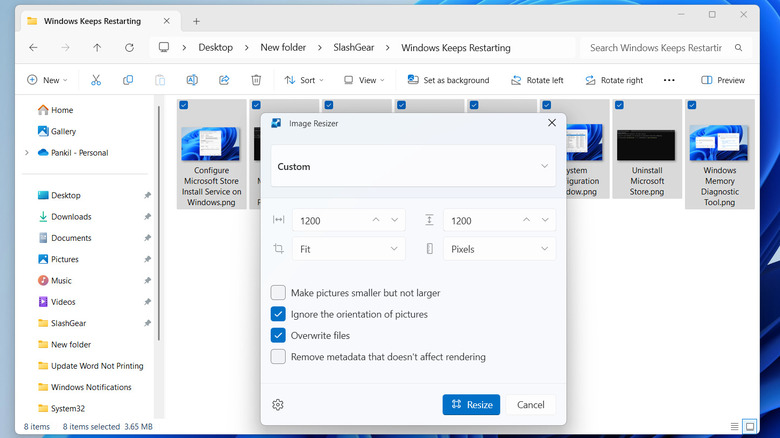
- Open the app, select the Image Resizer tab in the left pane, and turn on the toggle next to Enable Image Resizer.
- You can click the “Add new size” button to create a preset with custom dimensions.
- Now, open the File Explorer and locate the images you want to resize. Select all the images you want to resize by holding Ctrl and clicking on each file.
- Right-click on your selection and select Show more options > Resize with Image Resizer.
- In the Image Resizer dialog box, use the drop-down menu to select one of the predefined sizes, or choose Custom to enter your desired dimensions manually.
- If you want to overwrite the original images, tick the Resize the original pictures checkbox. Otherwise, the resized images will be saved as new files in the same folder.
- Finally, click the Resize button.
While PowerToys is great for bulk resizing, you can also use it to resize a single image. It’s faster and more efficient than using the Photos or Paint apps.
Source: http://www.slashgear.com/1741473/how-to-resize-an-image-on-mac-or-pc-computer-windows/
You may also like


Both Mac and Windows computers come equipped with built-in tools that make resizing images quick and easy.