 techandtab
Выбор планшета для рисования — это не просто вопрос бюджета или бренда. Это поиск инструмента, который станет продолжением...
How To Split Screen On Windows (And Why You Might Want To)

The split-screen view in Windows comes in handy when you want to review documents, compare product designs, or simply keep an eye on multiple tasks at once. This feature allows you to view and interact with two or more windows simultaneously, eliminating the need to constantly switch between tabs or apps. For example, you can chat with colleagues during a video call while referencing important data from a spreadsheet, or browse through research documents while keeping a social media feed or music app open on one side. The possibilities are endless.
Using multiple apps simultaneously in split-screen mode is particularly beneficial when working with a large monitor. It helps maximize screen space by keeping everything organized within a single display. This also eliminates the need for setting up multiple displays.
With the split-screen mode in Windows, you can easily arrange open apps side by side by snapping them to half, a quarter, or different corners of the screen — all without having to manually resize each window. In this article, we’ll guide you through the process of enabling and using the split-screen feature on your Windows 10 or 11 PC, helping you make the most of the screen space. Let’s dive in!
How to enable the snap windows feature
To arrange apps in different split screen layouts, you first need to enable the Snap windows feature on your Windows 10 and 11 PC. Here’s how to do that:
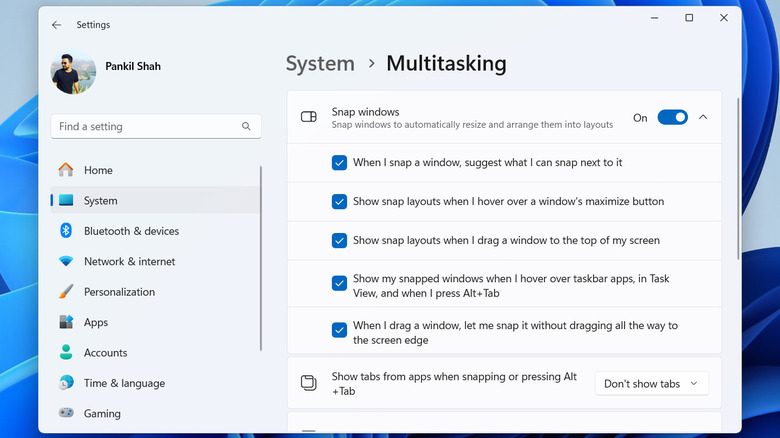
- Press Windows + I on your keyboard to open the Settings app.
- On Windows 11, go to the System tab in the left pane and click on Multitasking. If you’re using Windows 10, click the System option and select the Multitasking tab on your left.
- Enable the Snap windows toggle.
You can then customize how this feature works by clicking the arrow next to the Snap windows toggle. For example, you can enable snap suggestions to preview layout options when hovering over the maximize button or fine-tune snapping behaviors, such as displaying snapped windows in Task View. Once you’ve enabled the Snap Windows feature, you can split app windows on your screen in several different ways.
How to split screen on Windows
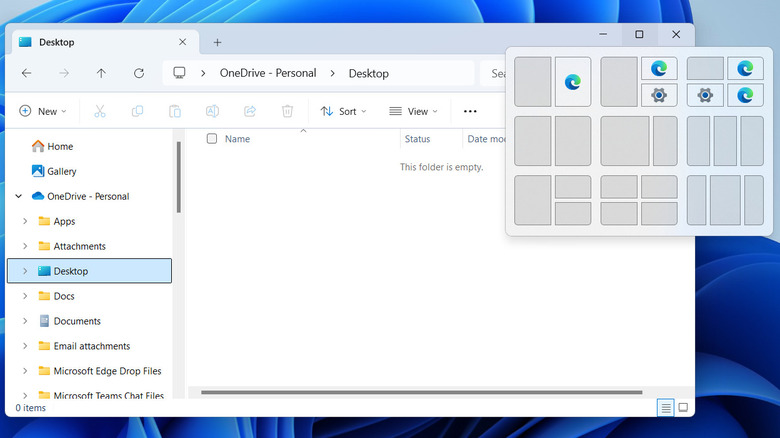
One of the easiest ways to arrange apps in split-screen mode is by using drag and drop. To do this, click and hold the title bar of a window, drag it to the left or right edge of the screen until a transparent outline appears, and then release the mouse. The window will snap to that side of the screen. Alternatively, you can hover your mouse over the maximize button in a window and select your preferred layout on Windows 11. Once you place the first app, Windows will display your other open apps and documents in the remaining split-screen areas. You can then click a thumbnail to fill the other section with your desired app.
Another efficient way to split your screen is by using keyboard shortcuts. By pressing the Windows key and one of the arrow keys, you can position a window in various areas of your screen. For example, the Up arrow moves the active window to the top half, the Left arrow moves it to the left side, and the Right arrow moves it to the right side. If you want to explore multiple layout options, press Windows + Z (Windows 11) and use the number keys to quickly arrange your open apps in various configurations.
Once your apps are in split-screen mode, you can adjust the window sizes by hovering your cursor over the edge or corner and dragging it. The other windows will automatically resize to accommodate the changes.
Source: http://www.slashgear.com/1732824/how-to-split-screen-on-windows-guide-why-might-want/
You may also like

